

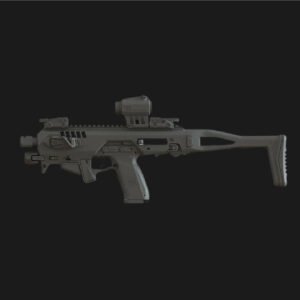


Husky Armory’s 3D Printed Glock 19 (FMDA DD19.2) parts kit includes everything you need to build a 100% 3D Printed Glock.
File & Build Information: 3D Printed FMDA DD19.2
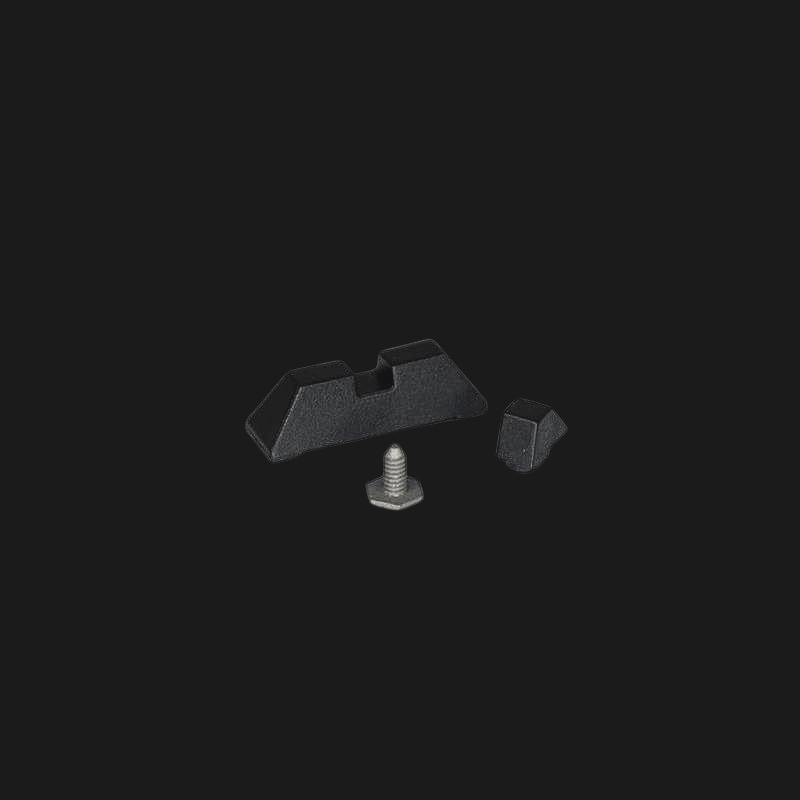
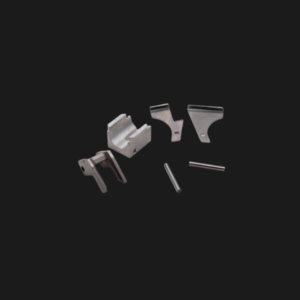
Included in the Glock 19 (DD19.2) Parts Kit
Our battle-tested Husky Armory 3D printed Glock 19 build kits will have your latest FMDA DD19.2 Glock running flawless.
- Glock 19 ‘Iditarod’ Slide Kit
- Lower Parts Kit
- Standard Glock 19 Sights
- DD19.2 Rail Kit
- Glock 19 Locking Block
What is a Glock 19 (FMDA DD19.2)
If you’re interested in firearms, you may have heard of the FMDA DD19.2, a 3D-printable Glock 19 frame. This design is based on the popular Glock 19 handgun, but it’s made entirely of plastic and can be printed at home using a 3D printer.
The FMDA DD19.2 has a number of features that make it a popular choice among DIY gun enthusiasts. These include:
- High-quality documentation provided by Ivan the Troll
- Improved durability compared to the original DD19 design
- Easy to print and assemble
- Ability to customize the look of the frame with different styles
Overall, the FMDA DD19.2 is a reliable and easy-to-use 3D printed Glock frame that is a great option for those looking to build their own firearm.
DD19.2 Requirements
To create the FMDA DD19.2 3D printed Glock frame, you will need the following materials:
- 3D printer (recommended printer: Ender 3 Pro, Bambu Labs P1P, or similar)
- PLA+ filament (recommended brands: eSun or Polymaker Pro
- Glock 19 Lower Parts Kit
- Glock 19 Slide Kit
- Glock Gen. 3 Locking Block
- DD19.2 Rails Kit
The good news is that Husky Armory’s FMDA 3D printed Glock 19 completion kit includes everything you need sans printer and filament.
Material Requirements
To create the FMDA DD19.2 3D printed Glock frame, you will need the following materials:
- 3D printer (recommended printer: Ender 3 Pro)
- PLA+ filament (recommended brands: eSun or Novamaker)
DD19.2 Printing Process
Preparation
Before printing the FMDA DD19.2 frame, you should ensure that you have all the necessary materials and equipment. Here is a list of what you will need:
- 3D printer
- Filament (preferably ABS)
- DD19.2 STL files
- Slicer software (e.g. Cura, PrusaSlicer)
- Sandpaper (220 grit)
- Files (round, flat)
Once you have gathered all the materials and equipment, you should start by ensuring that your 3D printer is properly calibrated. This is important because it will ensure that the final product is accurate and free from any defects. It is also recommended that you print a test object to check the calibration.
Printing
Once you have calibrated your 3D printer, you can start printing the FMDA DD19.2 frame. Here are the steps to follow:
- Load the DD19.2 STL files into your slicer software
- Adjust the settings to your preference (e.g. layer height, infill density)
- Slice the files and save the G-code to an SD card
- Insert the SD card into your 3D printer and start the print
- Monitor the print to ensure that it is progressing smoothly and without any issues
The printing process can take several hours, depending on your printer’s speed and the settings you have chosen. Once the print is complete, remove the frame from the printer bed and proceed to the post-printing process.
Post-Printing
After printing the FMDA DD19.2 frame, you will need to perform some post-processing to ensure that the frame is smooth and free from any defects. Here are the steps to follow:
- Remove any support structures using pliers or a knife
- Sand the rough areas of the frame with sandpaper (220 grit)
- Use files to smooth out any remaining rough spots
- Test fit the frame with the slide and other components to ensure that they fit properly
- If necessary, make any adjustments to the frame using a file or sandpaper
Once you have completed the post-processing, your FMDA DD19.2 frame is ready to be assembled with the slide and other components.
Assembly
Assembling the FMDA DD19.2 3D printed Glock frame is a straightforward process that requires minimal hand fitting of parts. The frame features a stronger, easier to install rear rail system that eliminates the need for screws. The P80-style grip angle of the frame is compatible with Glock/OEM style holsters.
To assemble the frame, you will need the following components:
- FMDA DD19.2 3D printed frame
- Glock OEM or aftermarket lower parts kit
- Glock OEM or aftermarket slide assembly
- Recoil spring assembly
- Barrel
To begin the assembly process, you will need to install the trigger housing assembly into the frame. This involves inserting the trigger spring and safety plunger into the housing, then sliding it into the frame and securing it in place with the locking block pin.
Next, you will need to install the magazine catch and spring, followed by the slide stop lever and spring. These components should be installed according to the manufacturer’s instructions for your specific lower parts kit.
Once the lower parts kit is installed, you can install the slide assembly onto the frame. This involves aligning the rails on the slide with the rails on the frame, then sliding the assembly onto the frame until it clicks into place.
Finally, you can install the barrel and recoil spring assembly into the slide. This involves inserting the barrel into the slide and securing it in place with the barrel lug, then installing the recoil spring assembly onto the barrel and into the slide.
With the assembly complete, you can test fire the pistol to ensure that it functions properly. Remember to always follow proper safety procedures when handling firearms, and to only use ammunition that is appropriate for your specific firearm.
Safety Measures
When it comes to 3D printed firearms, safety should always be the top priority. Here are some safety measures you should take when working with the FMDA DD19.2 3D printed Glock frame:
Use High-Quality Filament
The quality of the filament you use can greatly affect the safety and reliability of your 3D printed firearm. It is recommended to use high-quality filament such as eSun or Novamaker PLA+ to ensure the strength and integrity of your printed parts.
Follow the Instructions Carefully
It is crucial to carefully follow the instructions provided by the designer when assembling your 3D printed firearm. Any mistakes or errors during the assembly process can lead to serious safety issues.
Check for Proper Fit and Function
Before using your 3D printed firearm, it is important to check for proper fit and function of all parts. Make sure that all components fit together correctly and that there are no loose or wobbly parts. Test the firearm with dummy rounds to ensure that it functions properly.
Practice Safe Handling
Always practice safe handling when using a 3D printed firearm. Treat it with the same level of care and respect as you would any other firearm. Keep it unloaded when not in use, and always point it in a safe direction.
So why wait? Build your own customized Glock 19 today with the Husky Armory 3D Printed Glock 19 Completion Kit!
DISCLAIMER: This product is not manufactured, authorized, endorsed, or warranted by GLOCK. GLOCK does not warrant or represent that this product is compatible with GLOCK pistols
